Every business process or service depends on some form of data. You might work in IT, e-commerce, HR, facilities, or another field. Whatever business processes you work with, you will need your organisation's data to run those processes well and make good decisions.
The more accessible your data is, the more efficient your processes and services will be. That's where data modelling comes in. In this blog, we will go over the basics of data modelling. We will give you the steps to build your data model to improve or create productive business process.
- What is data modelling?
- Why is data modelling so important?
- How to do data modelling in 7 steps
- 1. Define the business problem and ideal solution
- 2. Gather your requirements
- 3. Build your conceptual data model
- 4. Create your logical data model
- 5. Identify the sources of your data
- 6. Create your physical data model
- 7. Maintain your data
What is a data model?
A data model is fundamental to making the right data available to your business processes. Without it you risk making errors in how you structure your data that are time consuming to fix later.
A data model defines the structure, attributes, and relationships of the data your business processes consume (don't worry if this sounds confusing now, you will learn more throughout the blog). A data model then gives you a blueprint to what data you need and how to get it into one place for your process to consume.
To explain the concepts in this blog, let's take an example of a small car rental company. They have employees who check out their vehicles at various rental offices. They are looking to improve their process of offering free upgrades to customers to grow loyalty. We will focus on their data throughout this blog but the same principles apply across any number of business use cases.
Why is data modelling so important?
Increasingly, companies are not understanding what data they have available. Which makes running efficient processes difficult and can have an impact on your organisation’s bottom line.
Data models help you get on top of your data and define exactly what data you need to be available. Then it helps you get all that data into an easy to consume format.
If you don't have a well thought out data model, you and your colleagues will likely spend a lot of time manipulating data to get it into a format that you can actually use for a business process. This wastes time and ultimately strangles the productivity of your team and business. For example, in a previous role before Starhive, I would spend 15 minutes exporting data from one software tool, reformatting it in a spreadsheet, only to upload it to another tool to actually use it. Doing that a few times a week was frustrating and is not efficient.
Without a good data model, you might also find you can't even access some critical data and have to make essential business decisions half-blind. Which of course, increases the chances of making the wrong decision.
A poor data model can also affect the scalability of your process. What if the car rental company wanted to start renting out other vehicles or providing additional services? Adding these to an existing, ad hoc data model might take a lot of work trying to fit a round peg into a square hole.
Having a well thought out data model means you will be able to see data from multiple sources, adapt when needed, and use your data efficiently. An organisation that cannot do this will spend much time and money working around poor data.
How to do data modelling in 7 steps
1. Define the business problem and ideal solution
The first thing to do is understand the problem you are trying to solve. Many businesses make the mistake of starting with the data first but to understand why data is created and what it is useful for, we need to understand the business processes first.
What processes are not working as you would like in your organisation today? Will having easy access to data make them faster or simpler? What would the most efficient process look like?
Make sure to speak with colleagues and stakeholders to understand the current process in detail and learn of any potential edge cases. See where the bottlenecks are, what context your colleagues are missing that slows them down, and what extra data would provide this context to help them.
In the car rental example, we might learn that employees are giving free vehicle upgrades on a first-come, first-served basis. A better approach would be to reward their most loyal customers with an upgrade or reward brand new customers to create new loyal customers. However, their system doesn't let them see a customer's previous rental data when they check them in. So, more data is needed for the check in staff.
2. Gather your requirements
From your research in the step above, you can start to outline the requirements for your processes that will use your new data model. You do not need to go into detail about the data; keep it high-level.
For the car rental example, this might look like:
- Employees can check in customers and give them their vehicles with the same efficiency as before
Need data on customers, their rental, and assigned vehicle - Employees can view customer rental history to better reward loyal and new customers
Need data on every previous rental a customer has had - Employees can see if any vehicles are available at their site as an upgrade
Need data on available vehicles with location and their tier
3. Build your conceptual data model
Next, take your general requirements and delve a little deeper to create what is known as the conceptual data model.
The conceptual model has two parts: the objects and the relationships.
Define the data objects you want to track
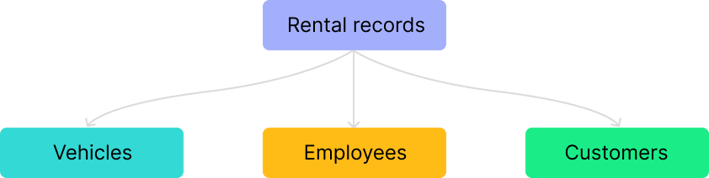
First, think about the objects (also known as entities or assets) you need to understand in your data. For the car rental example, that could be:
- Vehicles
- Customers
- Employees
- Rental records
There is no wrong or right list of objects to have in your data model. My tip is to think about what is most important to your business. If something is essential to your business, like a customer or employee, there's a high chance it should be an object.
Define the relationships between objects
Next, you need to understand how your different objects relate to each other. For example, each rental record will have at least one vehicle, customer, and employee attached to it. So now we have relationships between our different objects.
4. Create your logical data model
By now, you have your basics, a set of objects, and a way to relate them to each other. You now want to think about what defines your objects. What specific pieces of data represent a vehicle, for example?
These are called attributes. For a vehicle, they could be the vehicle model, licence number, availability status, rental office, tier, fuel type, transmission type, etc.
There are hundreds of attributes that could describe an object. When defining your attributes, you need to think about which attributes are crucial to your business processes and the problem(s) you're solving. Produce a list of attributes you want to store for each object. This list of objects and attributes is known as a logical data model.
At this stage it is good to think about the type of data for your attributes (is it text, a number, a date, an image, a location, or something else?). You don't need to go into detail, but knowing you want to store an image and a set of dates at this stage is useful for future steps. In traditional databases, you don't get many choices on attribute types; it's usually text or numeric data. With modern platforms like Starhive, you have the basic data types, as well as images, progress counters, URLs, locations, and much more. So consider what you need for your business process, not what your database will let you store at this stage.
For the car rental company, the logical data model might look something like this:

When learning about logical data models and relationships, you might read about primary keys. A primary key is an object's attribute with a unique value per object. They are used to build relationships between objects. In the image above the Customer email, Vehicle name, and Employee name - check in and Employee name - check out attributes link to other objects.
In more traditional databases, these are often hard to read data like customer ID and employee ID. In more modern databases, such as Starhive, it's more straightforward as the object's name acts as the unique value. But Starhive is smart enough to retain relationships even if the name changes.
Look for duplicated data and normalise your data model
There is an intriguing data modelling topic to discuss at this stage. In the logical data model above, both vehicle and employee have a rental office attribute. There is duplication of data. Ideally, you want to avoid duplications because they're a potential source of error. Let's say a rental office gets relocated and renamed. You would need to update it for every vehicle and employee, but you could miss one, and now you have errors in your database.
You could 'normalise' the data and create a new object called rental office. Then, you can build relationships between rental offices and vehicles and employees. Now, if a rental office relocates, it is updated once, and that's that.
Let's look at another example where the data can be normalised. Each vehicle stores attributes like manufacturer, tier, fuel type, and transmission type. Important for employees to know if they are looking at what cars to upgrade people to. However, if there are ten Tesla Model 3s, the same attributes are repeated for each individual Tesla. Instead, you can make another type of object called Vehicle Model and have an object called Tesla Model 3. The tier, fuel type, and transmission type are all stored on the overarching Tesla Model 3 object, and you can relate that to each individual car.
This normalisation would be helpful if more information about the cars, like the number of seats, was needed in the future. Only the Vehicle Model objects need updating with a new attribute called 'Number of seats'. Not every single individual car. Very helpful if you have 5 types of vehicle models but 1,000 individual vehicles of these five models.
With both changes above, the logical model would look something like this:

There is no right or wrong way to normalise your data. Some ways will make it more efficient to work with your data and reduce the risk of errors, but each business is unique. You need to consider what makes sense for your business and business process.
My recommendation is to look for sources of duplicated data and then decide if normalising makes sense. Sometimes, it will, as above, but other times, it won't. For example, transmission type—manual or automatic—will be repeated on every Vehicle model object. We could make the transmission type its own object that links to vehicle models. But this is too far, as the transmission type of an existing car model will never change so risks of errors are minor. And it's not a lot of data to repeat so data storage costs are not a big factor.
5. Identify the sources of your data
After building your logical data model, you should know what data you need. The next step is to identify what data you already have, where you store it, and what data you are missing.
Existing data can come from:
- Databases: everything from a specific data warehouse like BigQuery to a CRM
- Files: such as spreadsheets, which are all too often used to store critical data
- An API or web service: for example, if you build a SaaS product, specific user interactions might be vital data for your processes
An important thing to decide is how to handle this existing data. Do you add it to a new database with everything, or do you work with disparate data sources and connectors? This will be a personal decision for your organisation based on where your data is currently stored, what tools you already have access to, and your allocated budget.
In the small car rental company example, it could be a case of creating a data warehouse to unify data from a couple of different existing databases, along with a spreadsheet employees use to store vehicle model information. With everything in one place, employees can do their day-to-day jobs but with more context to let them reward the valuable customers for the business.
6. Create your physical data model
Finally, it is time to build your final data model - the physical data model. You need to take your logical model and put it in terms of the tool(s) you will use.
In this step, you will want to get as specific as possible and define the exact names, layout, and data types of your objects, attributes, and relationships. The more flexible a database you choose, the more likely it is to be simple to transfer your logical data model into your physical one. You should look at the how-to guides and documentation to learn how to structure things exactly.
This final step is often where things become a bit unstuck, especially with legacy databases. There are often situations where your data model needs to be adapted to fit into your chosen tool, which leads to compromises and reduced efficiency. If you're adapting an existing system, you may need to work around this. Otherwise, you can choose a database that allows completely custom data models like Starhive or Asset Panda. For example, there are some softwares out there that dictate certain categories of object you should track. If you want to track a different object, you need to start customising and that takes time but also often has limitations vs their standard, pre-defined objects.
This is the time to also understand how the various data connectors you may use work if you are not bringing all data into one source. Even if an integration exists between two tools, check that they surface the data you actually need as this can often catch people out.
7. Maintain your data
The final element of data modelling is to decide how to keep the data in your data model up to date and how to handle any changes. There are a few different types of changes to watch out for.
First, you will have daily changes to your data. In the car rental example, a daily change will be the availability status attribute for each vehicle as it gets rented. We recommend using automation rules (available in most modern data platforms) to update based on specific triggers for these routine changes. For example, once the rental booking date starts, the rented vehicle status automatically updates.
A small side note: you could get clever with automations to proactively flag to employees customers who should get a free upgrade to make the process even more efficient. But this can only happen if your data is unified and easily accessible.
There are also less routine but minor changes. We discussed an example earlier of what happens if a rental office changes its name or location. This is where your data model comes into its own. If the data model is efficient, data should only need to change in one place.
The final type of change you could face is a big business change that might need a significant change in your data model. For example, what if the rental service company also started offering business rentals? This change would have some implications for the data model, and it likely makes sense to go back through these steps and extend the data model with conscious thought.
Building your data model with Starhive
Now you have built your data model, it's time to actually add data into your chosen tool(s), in the structure you defined in your data model, and give access to the data to anyone working on the applicable business process,
With all the data modelling and database tools on the market, how can you tell which one is right for you? Starhive is an asset and service management solution that gives you flexibility. So you decide your data model and build it in our database without constraints. Your organisation is unique; your asset management platform shouldn't force you into storing assets a certain way or with certain attributes. And your service management solution should map to your processes.
If you would like help understanding if Starhive can work for your or store the data you need, we're on hand to help.